Hello!
I am so sorry that it has been such a long time since I last made a post here.
I have been extremely unwell for the last few months since my stay in hospital in May. It was a very intense two weeks that really took it out of me. I have now gotten all the results of the tests back but unfortunately they weren't what we were hoping for at all. The doctors have started me on some new medication so hopefully it will improve things a little bit.
I have started to feel a little better recently which is positive but I still haven't been up to doing much card making. I did make one for my Uncles birthday but it took me a week to finish because I was only up to doing little bits at a time. Fingers crossed I will continue to feel better and I will be able to make some more as I really miss doing it.
I will do my best to try and get some photos edited and a post written soon!
Until next time,
Lucy x
Monday 30 September 2013
Wednesday 29 May 2013
Horse Birthday Card
Hello Everyone,
I'm sorry it's been a few weeks since I last posted. I only got back home from hospital last friday, the stay was much longer than anticipated! They did get lots of tests and asessments done though so it was worth staying in. I've now just got to be paitent and wait for the results to come back!
Todays card is one I made for my Great Auntie who turned 70 this year. She has always loved horses and used to keep them when she was younger. So this image seemed perfect for her.

I started out by stamping the horse image onto Copic Xpress it Blending Cardstock in Memento Tuxedo Black ink. I then die cut it out using a Spellbinders Square die and used copic markers to colour the image. Next I die cut a Spellbinders Scalloped Square from some textured purple cardstock and adhered my die cut focal image onto it using a tape runner.
I created my sentiment using a JustRite alphabet and stamped it onto some more of the Copic Xpress it Blending Cardstock. I die cut it out using a Spellbinders Ribbon Trio Tag and then threaded the it onto some white grosgrain ribbon.
Next I cut down a piece of patterned paper to be slightly smaller than my card front. I rounded the corners using my We R Memory Keepers Corner Chomper. I adhered down my focal image using dimentional foam squares. I then placed my sentiment tag where I wanted it and wrapped the ends of the ribbon around the back of the patterned paper. I secured the ends down using small pieces of masking tape to hold it in place. I adhered my patterened paper onto the white card base using a tape runner.
I threaded some purple bakers twine through two buttons and tied them into bows. I adhered them onto the ribbon using some super sticky tape. To finish the card I adhered some rhinestones onto the four corners and one each side of the name on the sentiment.
I am going to enter this card into several challenges.
Daring Cardmakers Let's Plant a Tree Challenge
Allsorts Happy Birthday Challenge
Addicted to CAS Birthday Challenge
Ribbon Carousel Celebrations Challenge
CASology Furry Challenge
Simon Says Stamp and Show Into the Woods Challenge
Simon Says Stamp Anything Goes Challenge
Alphabet Challenge Blog H is for Happy Challenge
Songbird Challenges All Things Great and Small Challenge
I hope you have enjoyed viewing my blog today and I hope you will stop by again soon!
Until next time,
Lucy x
Supplies: Clear Dollar Stamps Horse Poetry Stamp Set (retired), JustRite Times New Roman Font Set (retired), Spellbinders Square Nestabilities, Spellbinders Scalloped Square Nestabilities, Spellbinders Ribbon Trio Tags, We R Memory Keepers Corner Chomper, Copic Markers, Copic Xpress it Blending cardstock, Dovecraft Back to Basics 1 Paper, Papermania Capsule Collection Double Sided Heavyweight Paper, Memento Tuxedo Black ink, The Twinery Bakers Twine, Buttons, Rhinestones, White Grosgrain Ribbon, Tombow Mono Adhesive tape runner, Dimentional foam squares.
Tuesday 7 May 2013
Cricut Cat Birthday Card
Hi Everyone,
I hope you have all had a lovely bank holiday weekend. Unfortunately for me I have spent it preparing for a week long stay in hospital. I am going in for some tests and assessments so this will probably be my last post for a little while.
Todays card is one I made for my Auntie. Technically she is no longer my Auntie as her and my Uncle divorced a few years ago but I still think of her that way.
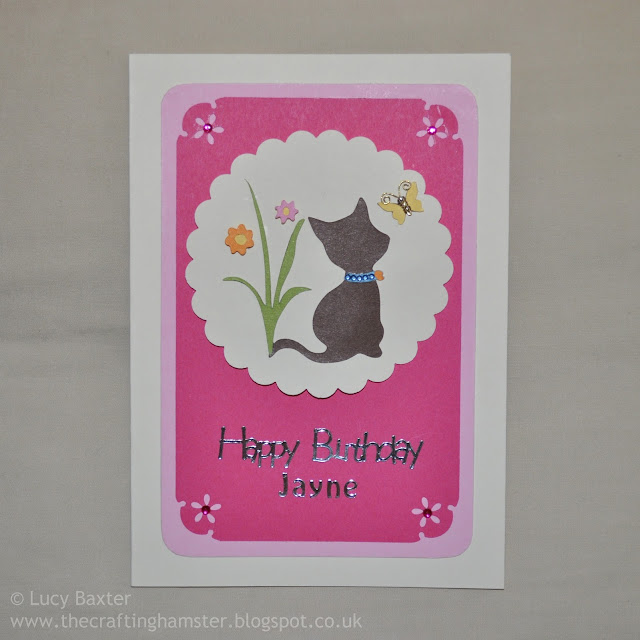
I started out by cutting the cat out on my Cricut Expression using the Kate's ABC's cartridge. I adhered all the pieces together and added a few rhinestones to the cats collar for embellishment. I then punched out a 3 1/2'' scalloped circle from cream cardstock and adhered the cat to it. I set my focal image aside while I worked on the rest of the card.
I cut down a piece of light pink cardstock so that there would be a 1 cm border of the card base showing. I then cut down a piece of dark pink cardstock so that there was a 0.5 cm border of the light pink cardstock showing. I rounded the corners on the light pink cardstock and used a decorative corner punch on the dark pink cardstock. I matted both of my layers onto my card base using a Tombow Mono Adhesive tape runner.
Next I adhered my focal image onto the card where I wanted it. In the space below I used some silver peel offs to add my Happy Birthday sentiment and the recipients name.
At this point I thought the card needed just a little something else so I took some dark pink rhinestones and added them to the centres of each of the flowers from the decorative corner punch. I also thought that the butterfly needed a little extra so I took some gold wire and threaded on two yellowish beads and twisted the wire to hold them on. I then curled the ends so that they looked like the butterflies antenna. Once I had adhered those I felt the card looked a lot more finished off so I decided to leave it there.
I am going to enter this card into some challenges.
Allsorts Add Some Sparkle Challenge
Ruby's Rainbow Furry Friends Challenge
A Blog Named Hero All That Glitters Challenge
Annabelle Stamps Anything Goes Challenge
CAS-ual Fridays Tic Tac Toe Challenge I chose Birthday, Bling and Punches or Dies.
I hope you have enjoyed stopping by my blog today, I really appreciate your visit and I hope you will stop by again soon!
Until next time,
Lucy x
Supplies: Cricut Expression, Kates ABC's Cartridge, 3 1/2'' Scalloped circle punch, Corner rounder punch, Decorative corner punch, Rhinestones, Gold wire, Beads, Silver peel offs, Sakura Quickie Glue Pen, Tombow Mono Adhesive tape runner, Cardstock
I hope you have all had a lovely bank holiday weekend. Unfortunately for me I have spent it preparing for a week long stay in hospital. I am going in for some tests and assessments so this will probably be my last post for a little while.
Todays card is one I made for my Auntie. Technically she is no longer my Auntie as her and my Uncle divorced a few years ago but I still think of her that way.

I cut down a piece of light pink cardstock so that there would be a 1 cm border of the card base showing. I then cut down a piece of dark pink cardstock so that there was a 0.5 cm border of the light pink cardstock showing. I rounded the corners on the light pink cardstock and used a decorative corner punch on the dark pink cardstock. I matted both of my layers onto my card base using a Tombow Mono Adhesive tape runner.
Next I adhered my focal image onto the card where I wanted it. In the space below I used some silver peel offs to add my Happy Birthday sentiment and the recipients name.
At this point I thought the card needed just a little something else so I took some dark pink rhinestones and added them to the centres of each of the flowers from the decorative corner punch. I also thought that the butterfly needed a little extra so I took some gold wire and threaded on two yellowish beads and twisted the wire to hold them on. I then curled the ends so that they looked like the butterflies antenna. Once I had adhered those I felt the card looked a lot more finished off so I decided to leave it there.
I am going to enter this card into some challenges.
Allsorts Add Some Sparkle Challenge
Ruby's Rainbow Furry Friends Challenge
A Blog Named Hero All That Glitters Challenge
Annabelle Stamps Anything Goes Challenge
CAS-ual Fridays Tic Tac Toe Challenge I chose Birthday, Bling and Punches or Dies.
I hope you have enjoyed stopping by my blog today, I really appreciate your visit and I hope you will stop by again soon!
Until next time,
Lucy x
Supplies: Cricut Expression, Kates ABC's Cartridge, 3 1/2'' Scalloped circle punch, Corner rounder punch, Decorative corner punch, Rhinestones, Gold wire, Beads, Silver peel offs, Sakura Quickie Glue Pen, Tombow Mono Adhesive tape runner, Cardstock
Sunday 28 April 2013
House Mouse Birthday Card
Hey everyone,
Today I am sharing a card I made for one of my good friends. She loves House Mouse and embroidery so I thought that this image would be perfect for her!

I started out by cutting a shape out on my Cricut from Copic Xpress it blending card using the Elegant Edges Cartridge. I then cut a slightly larger mat out of pink cardstock. Next I stamped my House Mouse image onto the cut out piece of Copic Xpress it card using Memento Tuxedo Black ink and coloured the image using Copic Markers. I layered my coloured piece onto the mat and set it aside.
Next I die cut two senitment strips out of pink cardstock using a JustRite Spellbinders die. Using silver peel offs I added a happy birthday sentiment and the recipients name onto the die cuts.
I then trimmed some patterned paper down to be slightly smaller than my card base. I adhered my focal image so it was central and then I adhered on my two sentiment strips so they were evenly spaced between the focal image and the edge of the patterned paper.
I threaded some pink bakers twine through four buttons and glued one button to each end of the sentiment strips. I wrapped the ends of the twine around the back of the patterned paper and secured them with a small piece of masking tape. To complete my card I adhered the patterned paper onto my pink card base using a Tombow Mono Adhesive tape runner.
I am going to be entering this card into a few challenges:
Simon Says Stamp and Show Colour Challenge
Simon Says Stamp Anything Goes Challenge
Cardz TV Cute as a Button Challenge
CAS-ual Fridays Birthday Bash Challenge
Addicted to CAS Flower Challenge
I really appreciate your visit and I hope you will stop by again soon!
Until next time,
Lucy x
Supplies: House Mouse 'Mouse Bounce' stamp, Cricut, Elegant Edges Cartridge, Copic Markers, Copic Xpress it Blending card, Memento Tuxedo Black ink, JustRite custom Spellbinders Die, Silver Peel offs, The Twinery Bakers Twine, Buttons, Cardstock, Cricut Doodlecharms Paper
Monday 22 April 2013
Oriental Thank You Card
Hey Everyone,
I'm still not well but I am trying to make more of an effort to keep updating my blog. I also wanted to say a warm welcome to my new followers! I really appreciate you following me, it really makes blogging worth while!
Today's card is one I made nearly two years ago for my Great Auntie and Uncle to thank them for my 21st Birthday present. They adore traveling and they had just been to South East Asia when I made them this card. I have always liked this card and it just came together so easily!

I started out by cutting and assembling the pagoda and bamboo stems from the Pagoda cartridge on my Cricut. I then cut a circle from cream cardstock using a 3 inch punch and stamped a chinese script background stamp onto it using Versafine Onyx Black ink. I layered on my bamboo stems and pagoda over the top of the stamped image to finish off my focal piece.
For my sentiment I stamped my Thank you greeting in Versamark Ink onto a small piece of red cardstock. I then heat embossed it using Ranger Super Fine Detail Gold Embossing Powder and added two black rhinestones to either side of the sentiment to finish it off.
Next I cut down a piece of black cardstock to be slightly smaller than my red card base. I ran the black cardstock through my Cuttlebug inside a Crafts Concepts Weaving Blocks embossing folder. I adhered the embossed black cardstock onto my card base using double sided tape.
To finish the card I adhered my focal piece and sentiment to the card using some foam squares.
I am going to enter this card into three challenges.
Crafty Creations Challenge No Patterned Paper
Simon Says Stamp Travel/Cityscapes
Ruby's Rainbow Round and Round
Thank you for stopping by my blog today, I hope you will visit again soon!
Until next time,
Lucy x
Supplies: Cricut, Pagoda Cartridge, Cuttlebug, Crafts Concepts Weaving Blocks embossing folder, Unknown Chinese Script stamp, Unknown Thank You stamp, Versafine Onyx Black Ink, Versamark Ink, Ranger Super Fine Detail Gold Embossing Powder, Rhinestones, 3'' Circle Punch, Cardstock, Heat tool, Double sided tape, Dimentional Foam Squares, Sakura Quickie glue pen
Tuesday 16 April 2013
Lily of the Valley Birthday Card
Hi all,
I'm really sorry for posting so infrequently, I'm still having a really difficult time and I have been very unwell on top of it all. I am sleeping an incredible amount, sometimes up to 18 hours a day. I just haven't had the time or energy for blogging, I hope you will all understand.
Today's card is one I made for my Nan's birthday in May last year. Her birthday flower is Lily of the Valley which is why I chose this particular image.

I don't have the energy to go into the details of how I made this card but if anyone has any questions please feel free to ask me and I will do my very best to answer. It is very similar to this card that I made not too long ago.
I am going to enter this into some challenges.
Simon Says Stamp April Showers or Spring Flowers Challenge
Dies to Die for Spring Challenge
Allsorts Letter of your Name Challenge (L = Lily of the Valley and Lavender!)
Until next time,
Lucy x
Supplies: Justrite Breath of Spring Stamp set, Hero Arts Yummy Treats Stamp set, Papermania Relatives Stamp Set, Spellbinders Classic Ovals, Spellbinders Scalloped Ovals, Rhinestones, Dovecraft Back to Basics 1, Satin Ribbon, Copic Markers, Copic Xpress it Blending cardstock, Memento Tuxedo Black ink, Versafine Onyx Black ink, Tombow Mono Adhesive tape runner, Dimentional foam squares.
Saturday 6 April 2013
Spring Themed Friend Card
Hi everyone,
Just a quick post to share this card I made for my Mum to give to her best friend. They have been friends for 30 years hence the little 30 in the sun!
 I started out by cutting a shaped rectanged from a blue piece of card on my Cricut. I then cut a frame from cream cardstock that was the same size as the blue layer. The last thing I cut was my grass using some green cardstock. I used the Plantain Schoolbook cartridge for all three pieces.
I started out with my cut piece of Blue cardstock, I layered the grass onto the bottom and trimmed around the edges so it was flush to the blue cardstock. Next I adhered my cream frame over the top to hide the edges of the grass.
I had some die cut flower toppers in my stash so I used them up on this card. I thought the greens were a pretty close match. Next I adhered a butterfly topper that I also found in my stash. Once I had adhered it I thought it looked too plane so I got out my wire and beads to made a body and antenna for it.
I freehand cut a sun from some light yellow cardstock and then punched a circle from some darker yellow cardstock for the centre. I adhered the two pieces together and added a small 30 to the sunshine using gold peel offs. I adhered my sun to the top left corner of my panel using dimentional foam adhesive to finish off my panel.
I used a white cardbase and stamped my Friend greeting directly onto it using Encore Gold Metallic Ink. I added two pink rhinestones to either side of the sentiment to finish it off.
I adhered my panel to the card to finish the card.
I am going to be entering this card into a few challenges:
Addicted to CAS Friend Challenge
Addicted to Stamps and More CAS Challenge
Allsorts Challenge Spring Has Sprung Challenge
Crafty Creations Challenges Flowers or Fairies Challenge
Simon Says Stamp and Show Anything Goes Challenge
I hope you have enjoyed stopping by my blog today, I hope you will visit again soon!
Until next time,
Lucy x
Supplies: Cricut, Plantain Schoolbook cartridge, Hero Arts Thank you for being my friend stamp set, Wire, Beads, Rhinestones, Die cut toppers, Circle punch, Gold peel offs, Encore Metallic Gold Ink, Cardstock.
Just a quick post to share this card I made for my Mum to give to her best friend. They have been friends for 30 years hence the little 30 in the sun!

I started out with my cut piece of Blue cardstock, I layered the grass onto the bottom and trimmed around the edges so it was flush to the blue cardstock. Next I adhered my cream frame over the top to hide the edges of the grass.
I had some die cut flower toppers in my stash so I used them up on this card. I thought the greens were a pretty close match. Next I adhered a butterfly topper that I also found in my stash. Once I had adhered it I thought it looked too plane so I got out my wire and beads to made a body and antenna for it.
I freehand cut a sun from some light yellow cardstock and then punched a circle from some darker yellow cardstock for the centre. I adhered the two pieces together and added a small 30 to the sunshine using gold peel offs. I adhered my sun to the top left corner of my panel using dimentional foam adhesive to finish off my panel.
I used a white cardbase and stamped my Friend greeting directly onto it using Encore Gold Metallic Ink. I added two pink rhinestones to either side of the sentiment to finish it off.
I adhered my panel to the card to finish the card.
I am going to be entering this card into a few challenges:
Addicted to CAS Friend Challenge
Addicted to Stamps and More CAS Challenge
Allsorts Challenge Spring Has Sprung Challenge
Crafty Creations Challenges Flowers or Fairies Challenge
Simon Says Stamp and Show Anything Goes Challenge
I hope you have enjoyed stopping by my blog today, I hope you will visit again soon!
Until next time,
Lucy x
Supplies: Cricut, Plantain Schoolbook cartridge, Hero Arts Thank you for being my friend stamp set, Wire, Beads, Rhinestones, Die cut toppers, Circle punch, Gold peel offs, Encore Metallic Gold Ink, Cardstock.
Wednesday 3 April 2013
Tulip Flowers Birthday Card
Hi everyone,
Please forgive me for my absence, I am still going though a difficult time and I have been really ill on top so I just haven't felt like blogging.
I made this card for my next door neighbour for her birthday. I thought the yellow was very cheerful and spring like.
 I started out by stamping the Tulips and a border from the Justrite Breath of Spring Stamp set. I used Memento Tuxedo Black ink onto Xpress it Blending Cardstock and then I coloured it in using Copic markers. I die cut the flowers and border using a Spellbinders Classic Oval. I also die cut a yellow scalloped oval using a Spellbinders Scalloped Oval die to mount my focal image onto. I adhered yellow rhinestones onto each of the scallops to finish my focal image.
I stamped the sentiment using Versafine Onyx Black ink and die cut it out using a Spellbinders die from the Ribbon Tag Trio set. I threaded some white grosgrain ribbon through the tag and set it aside with my focal image.
Next I cut down a piece of gingham patterned paper to slightly smaller than my card base. I adhered my sentiment tag onto the bottom of the patterned paper where I wanted it and wrapped the ends of the ribbon around the back of the paper. I secured them down with a small amount of masking tape.
I then adhered my patterned paper onto my cardbase using a Tombow Mono Adhesive tape runner. To finish my card I adhered my focal image using some dimentional foam squares.
I am going to enter this card into a couple of challenges.
Addicted to CAS Spring Challenge
Less is More Use Scallops Challenge
Hiding in my Craftroom Freestyle Challenge
Simon Says Stamp and Show Anything Goes Challenge
Ribbon Carousel Showers and Flowers Challenge
I hope you have enjoyed viewing todays card. It is very difficult to post frequently right now with everything that I've got going on but I will do my best!
Until next time,
Lucy x
Supplies: Justrite Breath of Spring Stamp set, Papertrey Ink Birthday Basics Stamp set, Spellbinders Classic Ovals, Spellbinders Scalloped Ovals, Spellbinders Ribbon Tags Trio, Rhinestones, Papermania Capsule Collection Double Sided Heavyweight Paper pack, Grosgrain Ribbon, Inspire Me Snow White Card Base, Copic Markers, Copic Xpress it Blending cardstock, Memento Tuxedo Black ink, Versafine Onyx Black ink, Tombow Mono Adhesive tape runner, Dimentional foam squares.
Sunday 17 March 2013
Astronaut Cross Stitched Birthday Card
Hi all,
Just a quick post today. I made this cross stitched card for my Partner a several years ago. I used a Mouseloft kit and peel offs.
 I am entering close to the deadlines but I am going to enter this into Crafty Card Makers Masculine Birthday Card Featuring Technology or a Gadget Challenge and CASology Extraterrestrial Challenge.
Thank you for stopping by today!
Until next time,
Lucy x
Supplies: Mouseloft Bi-Plane cross stitch kit, Mouseloft navy blue tri fold aperture card, Silver Peel offs, Double sided tape.
Just a quick post today. I made this cross stitched card for my Partner a several years ago. I used a Mouseloft kit and peel offs.

Thank you for stopping by today!
Until next time,
Lucy x
Supplies: Mouseloft Bi-Plane cross stitch kit, Mouseloft navy blue tri fold aperture card, Silver Peel offs, Double sided tape.
Monday 11 March 2013
Butterfly Thank you Card
Hi Everyone,
I'm sorry I haven't been posting very much, I have been going through a difficult time recently and I haven't been in the mood for posting.
Today I am sharing a Thank you card I made a while ago. Its quite a simple card but I thought it was quite pretty.
 I started by punching a circle from light purple cardstock and one from silver. I adhered a K&Co Butterfly to the silver circle and then adhered the silver circle to the purple circle. I glued some purple flowers and some blue rhinestones around the edge of the purple circle to finish my focal image.
I stamped the Thank You greeting using Encore Metallic Silver Ink onto my purple card base and adhered two rhinestones either side of the greeting. To finish my card I adhered the focal point onto my card using foam dimentionals.
I am going to enter this into the {PIN}spirational Challenge #47 and Addicted to CAS Challenge Wings.
Thank you for viewing, I hope you have enjoyed stopping by today!
Until next time,
Lucy x
Supplies: K&Co Butterflies, Thank You Greeting Stamp, Rhinestones, Cardstock
I'm sorry I haven't been posting very much, I have been going through a difficult time recently and I haven't been in the mood for posting.
Today I am sharing a Thank you card I made a while ago. Its quite a simple card but I thought it was quite pretty.

I stamped the Thank You greeting using Encore Metallic Silver Ink onto my purple card base and adhered two rhinestones either side of the greeting. To finish my card I adhered the focal point onto my card using foam dimentionals.
I am going to enter this into the {PIN}spirational Challenge #47 and Addicted to CAS Challenge Wings.
Thank you for viewing, I hope you have enjoyed stopping by today!
Until next time,
Lucy x
Supplies: K&Co Butterflies, Thank You Greeting Stamp, Rhinestones, Cardstock
Wednesday 27 February 2013
Hamster Birthday Card for a Special Friend
Hey Everyone,

Today I am sharing a card I made for a very good friend of mine. We met through our love for hamsters so I thought that this stamp would make the perfect card for her! I even tried to colour the hamster to look like hers! I mailed it off to her yesterday, she lives in the USA so
it will be a little while before she recieves it but I really hope she
will like it!

I started out by stamping the hamster onto Copic X-press it blending card using Memento Tuxedo Black ink. I then coloured it in using Copic markers and fussy cut it out.
I stamped the image again onto pink cardstock and die cut it out using a Spellbinders Circle die. I glued my fussy cut hamster onto the pink circle using a Sakura Quickie glue pen making sure to align it properly with the outline. I die cut another circle from red cardstock this time using a Spellbinders Lacey Circle die. I matted my pink circle on top using a Tombow Mono Adhesive tape pen. To finish my focal point I adhered pink rhinestones at evenly spaced points around the perimeter of the circle.
Next I cut down some patterned paper from the My Minds Eye Six by Six Happy Day paper pack. I used my We R Memory Keepers Corner Chomper to round the corners of both the pattern paper and my red card base.
I then die cut a tag from pink cardstock using a Spellbinders Grommet Tag die and stamped a sentiment onto it using Versafine Onyx Black ink. I tied some red buttons onto the tag using some bakers twine from The Twinery. I adhered the tag onto my pattered paper and wrapped the loose ends of the twine around the back of the paper. I secured them down with a little bit of masking tape. I matted my patterned paper onto my card base using a Tombow Mono Adhesive tape pen. Finally I adhered my focal image onto the card using dimentional foam dots. As a finishing touch I added a single rhinestone to each of the corners.
I am going to be entering this card into three challenges. Allsorts Animals Challenge, CASology Circle Challenge and Simon Says Stamp Anything Goes Challenge.
Thank you for stopping by my blog today, I hope you have enjoyed your visit! Please stop by again soon!
Until next time,
Lucy x
Supplies: Raisin Boat Hug a Hamster Stamp set, Stamping All Day Mix and Match sentiment stamps, My Minds Eye Six by Six Happy Day paper pack, Inspire Me Paper, Copic X-press it blending card, Copic markers, Spellbinders Lacey Circles Die, Spellbinders Circles Die, Spellbinders Grommet Tags Die, The Twinery Twine, We R Memory Keepers Corner Chomper, Tombow Mono Adhesive tape pen, Sakura Quickie Glue Pen, Versafine Onyx Black ink, Memento Tuxedo Black ink, Buttons, Rhinestones
Saturday 23 February 2013
21st Birthday Card
Hi everyone,
I thought I would share another old card with you today. I made this for my partner for his 21st Birthday two years ago although I have only recently gotten round to photographing it!
 I started off by cutting down a black piece of cardstock slightly smaller than my white card base. I then matted the black layer to my card base using double sided tape. Next I adhered some silver ribbon to the top and bottom of the black layer using double sided tape. I used a 3'' circle punch to cut a circle from silver cardstock. I adhered the circle to the centre of my card and carefully glued rhinestones all the way around the perimeter using PVA glue. I adhered some store bought die cut glitter numbers to the centre of the silver circle to finish my focal image. For my sentiments I used a pack of store bought 'toppers' and I added my partners name using glitter alphabet peel offs.
To finish off the card I made a key tag from a die cut silver key and some ribbon. I wrapped the ribbon over the top of the card and adhered inside.
I have learnt so much since I made this card, if I were to make it again I'm sure it would be a quite a bit different! To start with I wouldn't be using premade store bought toppers as I now have all the equipment to make my own! It's all experience though!
I am entering this card into three challenges Songbird Challenges 16 going on 17 Age Challenge, CAS-ual Fridays Hi Ho Silver Challenge and Addicted to CAS Masculine Challenge. I hope I qualify for these challenges, I made this card a while ago but I have never posted it on my blog.
Thank you for visiting, I hope you have enjoyed stopping by!
Until next time,
Lucy x
Supplies: Cardstock, Ribbon, Store bought toppers, Glitter alphabet peel offs, rhinestones
Thursday 21 February 2013
Baby Boy Card
Hi all,
I saw the recent challenge on The Paper Players which was Buttons and Bows for baby. It made me think of the card that I made for my Cousin when he had his son last year.
 I started out by stamping the rattle and two sentiments from the Papertrey Ink stamp set Baby Button Bits onto a piece of cream cardstock using Versafine Onyx Black ink. I found a button that was the right colour and size for the centre of the rattle and sewed it on. I then matted the cream cardstock with a piece of baby blue cardstock and added a rhinestone to each of the corners to finish my focal image.
Next I trimmed a piece of white cardstock slightly smaller than my card base and embossed just the bottom portion with the Cuttlebug Swiss Dots embossing folder. I then wrapped some blue striped ribbon around the cardstockand tied it into a bow as I wanted to cover the join where the embossing started. I die cut a tag using a JustRite custom Spellbingers die and stamped the baby's name onto it using JustRite alphabet stamps. I sewed on a small silver dummy charm and the tag underneath the bow. I adhered my white panel onto my cream card base using a Tombow Mono adhesive tape runner. To finish the card I attached my focal panel with dimentional foam adhesive.
I am entering this card into The Paper Players Buttons and Bows for Baby Challenge and Simon Says Stamp and Show Metal-ology Challenge.
Before I go I just want to say thank you to all of the people who have chosen to follow me, I really appreciate it! At first I was quite doubtful that anyone would be interested but you have really made me feel like it is worthwhile me blogging about my cards. I hope I am able to continue sharing my creations with you in the future!
I hope you have enjoyed viewing my blog today and I hope you will stop by again in the future!
Until next time,
Lucy x
Supplies: Papertrey Ink Baby Button Bits stamp set, Inspire Me Paper, JustRite custom Spellbinders dies, JustRite alphabet stamps, Cuttlebug Swiss Dots embossing folder, Cuttlebug button, ribbon, rhinestones, silver dummy charm, Versafine Onyx Black ink, Tombow Mono Adhesive tape runner
I saw the recent challenge on The Paper Players which was Buttons and Bows for baby. It made me think of the card that I made for my Cousin when he had his son last year.

Next I trimmed a piece of white cardstock slightly smaller than my card base and embossed just the bottom portion with the Cuttlebug Swiss Dots embossing folder. I then wrapped some blue striped ribbon around the cardstockand tied it into a bow as I wanted to cover the join where the embossing started. I die cut a tag using a JustRite custom Spellbingers die and stamped the baby's name onto it using JustRite alphabet stamps. I sewed on a small silver dummy charm and the tag underneath the bow. I adhered my white panel onto my cream card base using a Tombow Mono adhesive tape runner. To finish the card I attached my focal panel with dimentional foam adhesive.
I am entering this card into The Paper Players Buttons and Bows for Baby Challenge and Simon Says Stamp and Show Metal-ology Challenge.
Before I go I just want to say thank you to all of the people who have chosen to follow me, I really appreciate it! At first I was quite doubtful that anyone would be interested but you have really made me feel like it is worthwhile me blogging about my cards. I hope I am able to continue sharing my creations with you in the future!
I hope you have enjoyed viewing my blog today and I hope you will stop by again in the future!
Until next time,
Lucy x
Supplies: Papertrey Ink Baby Button Bits stamp set, Inspire Me Paper, JustRite custom Spellbinders dies, JustRite alphabet stamps, Cuttlebug Swiss Dots embossing folder, Cuttlebug button, ribbon, rhinestones, silver dummy charm, Versafine Onyx Black ink, Tombow Mono Adhesive tape runner
Monday 18 February 2013
Plane Cross Stitch Card
Hey Everyone,
As well as paper crafts I also love to Counted Cross Stitch kits. From time to time I like to make cards using small cross stitch kits as my focal image. I made this card for my Uncle a few years ago, he loves aeroplanes and he really liked this card.
 To start off I completed the Bi-Plane kit by Mouseloft. I then adhered cross stitched piece of aida into the inside of a navy blue tri-fold aperture card also from Mouseloft using some double sided tape. To finish it off I used some silver peel offs to add the Happy Birthday and Uncle sentiments. I kept this card quite simple to show of the cross stitching.
I am going to enter this card into three challenges Less is More Up in the Air Challenge, Allsorts Things with Wings Challenge and Alphabet Challenge Blog A is for Anything with Wings Challenge. I think this cards fits those challenges pretty well!
Until next time,
Lucy x
Supplies: Mouseloft Spaceman cross stitch kit, Mouseloft navy blue tri fold aperture card, Silver Peel offs, Double sided tape.
Thursday 14 February 2013
Easel Valentines Day Card
Hi again!
My Partner and I swapped Valentines cards this morning so I can finally share with you the card I made for him this year!

 I started out by creating my card base. I used a white 13.5cm square folded card and made a panel
from white cardstock that was exactly the same size. I then folded one half of the card base
inward to the central fold. I adhered my panel onto the bottom of the side I folded to create the card front.
I started out by creating my card base. I used a white 13.5cm square folded card and made a panel
from white cardstock that was exactly the same size. I then folded one half of the card base
inward to the central fold. I adhered my panel onto the bottom of the side I folded to create the card front.
Next I stamped my Lil' Inkers 2 Cute Ink Hamster Cupid onto Copic Xpress it blending card using Memento Tuxedo Black ink. I coloured it in using Copic Markers and a Sakura Clear Star pen for the wings. I die cut the image out using a Spellbinders Label 18 die. I then die cut a larger dark pink cardstock layer using the next size up Label 18 die. I matted the two die cuts together to form my focal image. I added some light pink rhinestones around the dark pink layer to give it some sparkle.
For my sentiment I die cut a Spellbinders Labels Trio die from white card stock and stamped a greeting from Waltzing Mouse Stamps Sweethearts set using Versafine Onyx Black ink.
I then cut a piece of stripy patterned paper a little smaller than my card front. I adhered the sentiment die cut to the patterned paper and added some heart shaped buttons either side with twine threaded through them. I wrapped the loose ends of the twine around the back of the paper and secured them with a small amount of masking tape. I then adhered the whole panel onto the card front using my Tombow Mono Adhesive tape runner. To finish the card front I adhered my focal image to the card using foam dimentionals.
For my stopper on the inside I cut a strip of the dark pink cardstock and matted it with a smaller piece of white cardstock. I then stamped another greeting from Waltzing Mouse Sweethearts stamp set onto it using Versafine Onyx Black ink. I adhered the strip inside the card at the bottom using foam dimentionals.
I am really pleased with how my first attempt at an easel card turned out! Definitely something I want to do again in the future! Luke liked it and thought it was cool which made me really happy.
I am going to enter this card into Cardz TV Make a Valentine card with a critter Challenge.
Thank you for stopping by today, I hope you have enjoyed your visit. Please feel free to leave me a comment, they are all very much appreciated!
Until next time,
Lucy x
Supplies: Lil' Inkers 2 Cute Ink Hamster Cupid, Waltzing Mouse Sweethearts stamp set, Spellbinders Label 18, Spellbinders Labels Trio, Copic Markers, Copic Xpress it blending card, Papermania Capsule Collection Double Sided Heavyweight Paper pack, Papermania Colossal Collection Paper, Button, Divine Twine, Rhinestones, Sakura Clear Star Pen
My Partner and I swapped Valentines cards this morning so I can finally share with you the card I made for him this year!


Next I stamped my Lil' Inkers 2 Cute Ink Hamster Cupid onto Copic Xpress it blending card using Memento Tuxedo Black ink. I coloured it in using Copic Markers and a Sakura Clear Star pen for the wings. I die cut the image out using a Spellbinders Label 18 die. I then die cut a larger dark pink cardstock layer using the next size up Label 18 die. I matted the two die cuts together to form my focal image. I added some light pink rhinestones around the dark pink layer to give it some sparkle.
For my sentiment I die cut a Spellbinders Labels Trio die from white card stock and stamped a greeting from Waltzing Mouse Stamps Sweethearts set using Versafine Onyx Black ink.
I then cut a piece of stripy patterned paper a little smaller than my card front. I adhered the sentiment die cut to the patterned paper and added some heart shaped buttons either side with twine threaded through them. I wrapped the loose ends of the twine around the back of the paper and secured them with a small amount of masking tape. I then adhered the whole panel onto the card front using my Tombow Mono Adhesive tape runner. To finish the card front I adhered my focal image to the card using foam dimentionals.
For my stopper on the inside I cut a strip of the dark pink cardstock and matted it with a smaller piece of white cardstock. I then stamped another greeting from Waltzing Mouse Sweethearts stamp set onto it using Versafine Onyx Black ink. I adhered the strip inside the card at the bottom using foam dimentionals.
I am really pleased with how my first attempt at an easel card turned out! Definitely something I want to do again in the future! Luke liked it and thought it was cool which made me really happy.
I am going to enter this card into Cardz TV Make a Valentine card with a critter Challenge.
Thank you for stopping by today, I hope you have enjoyed your visit. Please feel free to leave me a comment, they are all very much appreciated!
Until next time,
Lucy x
Supplies: Lil' Inkers 2 Cute Ink Hamster Cupid, Waltzing Mouse Sweethearts stamp set, Spellbinders Label 18, Spellbinders Labels Trio, Copic Markers, Copic Xpress it blending card, Papermania Capsule Collection Double Sided Heavyweight Paper pack, Papermania Colossal Collection Paper, Button, Divine Twine, Rhinestones, Sakura Clear Star Pen
Wednesday 13 February 2013
Valentines Card
Hi everyone,
I'm sharing another old card with you today, I made this one for my Partner for Valentines day 2010.
I have been photographing my cards for almost 3 years and I thought it seemed a shame not to share some of them on my blog. I'm not well enough to make cards that often, on average I only make 2 cards a month so sharing old cards lets me blog more frequently.
 This card was pretty simple to make. I stamped the 'to the one I love' sentiment onto a cut down piece of red cardstock using Encore Gold Metallic Ink. I then spelt out my partners name on another small piece of the same red cardstock using gold peel off letters.
I cut some layers out of cream and brown cardstock and matted them to my red card base. I adhered the sentiment and name panel to the card base and then added on some premade store bought heart 'toppers' in between.
My card making style has evolved quite a lot since I first started making cards 5-6 years ago. When I first started I thought that the only things you could get for card making were peel offs and premade toppers. Over the years I have learnt that there are so many cool tools and techniques available to make your own focal images. I haven't used a premade topper since 2011 and I probably won't ever use one again but I see these cards as a progression of my skills.
I am entering this into the CASology Red Challenge.
I hope you have enjoyed viewing my blog today. I actually managed to make my Partner a card for this years Valentines Day so I will be back soon to share that with you! He follows my blog so I will have to wait to post it until I have given it to him or he will get a sneek peak!
Until next time,
Lucy x
Supplies: Encore Gold Metallic Ink, Premade Heart Toppers, Sentiment stamp from Hobby Craft, Gold peel off letters
Monday 11 February 2013
Wedding Card
Hi again!
I have only made one card so far this year, I just haven't been well enough to make any new ones. I am still hoping I will be able to make a card for my partner for Valentines day before the 14th!
Todays card is one I made for my Uncles wedding last year.
 I started off by stamping the wedding cake image from There She Goes Cupcake Mix and Match stamp set onto Copic Xpress it Blending card using Memento Tuxedo Black ink. I coloured the image with Copic markers. I then die cut it out using a Spellbinders Nestabilities Circle. I die cut a slightly larger scalloped circle from gold patterned paper using Spellbinders Nestabilities Scalloped Circle. I adhered the two circles together and added pearls onto each scallop to finish my focal image.
Next I took my white square card base and punched all the corners using my Hobbycraft Corner Heart punch. I cut a piece of cream paper slightly smaller than my card base and punched the corners of that using the same punch. I wrapped a piece of 1'' white satin ribbon around the middle of the cream paper and then matted the layer onto my card front. I adhered my focal image onto the card base using dimentionals. I finished off the card by using peel offs to add both of the recipients names and congratulations.
This card was quite hard to photograph, it either ended up washed out or too dark! I tried adjusting it using my photo editing software but it still didn't come out the best!
I am entering this card into There She Goes Flowers Challenge as I used a There She Goes Stamp which has flowers on it!
I hope you have enjoyed my card today and I hope you will visit again soon!
Until next time,
Lucy x
Supplies: There She Goes Cupcake Mix and Match stamp set, Copic Markers, Copic Xpress it Blending card, Memento Tuxedo Black ink, 1'' white satin ribbon, Gold peel offs, Annabelle Stamps Pearls, Hobbycraft Heart punch
I have only made one card so far this year, I just haven't been well enough to make any new ones. I am still hoping I will be able to make a card for my partner for Valentines day before the 14th!
Todays card is one I made for my Uncles wedding last year.

Next I took my white square card base and punched all the corners using my Hobbycraft Corner Heart punch. I cut a piece of cream paper slightly smaller than my card base and punched the corners of that using the same punch. I wrapped a piece of 1'' white satin ribbon around the middle of the cream paper and then matted the layer onto my card front. I adhered my focal image onto the card base using dimentionals. I finished off the card by using peel offs to add both of the recipients names and congratulations.
This card was quite hard to photograph, it either ended up washed out or too dark! I tried adjusting it using my photo editing software but it still didn't come out the best!
I am entering this card into There She Goes Flowers Challenge as I used a There She Goes Stamp which has flowers on it!
I hope you have enjoyed my card today and I hope you will visit again soon!
Until next time,
Lucy x
Supplies: There She Goes Cupcake Mix and Match stamp set, Copic Markers, Copic Xpress it Blending card, Memento Tuxedo Black ink, 1'' white satin ribbon, Gold peel offs, Annabelle Stamps Pearls, Hobbycraft Heart punch
Saturday 9 February 2013
Valentines Card
Hi all,
Two posts in two days, that must be some sort of record for me!
Today I am sharing the Valentines card I made for my partner last year. I haven't been well enough to make this years yet!
 I started by cutting out the kissing squirrels using my Cricut and the Give a Hoot cartridge. I then adhered all the layers together. I cut a large heart out of red cardstock using my Cricut and the Plantin Schoolbook cartridge. I ran the heart through my Cuttlebug in the D'vine Swirls embossing folder. I swiped Memento Rhubarb Stalk ink over the embossed surface to highlight the swirls. I adhered the kissing squirrels to the heart to finish off my focal image.
For my background I used my Cricut to cut a piece of black cardstock using the Elegant Edges cartridge. I matted it to my red card base and used my Sakura Clear Star pen to highlight the hearts.
I die cut two JustRite custom Spellbinders tags from fuchsia cardstock and stamped two of the sentiments from the Waltzing Mouse Sweethearts stamp set using Versafine Onyx Black ink. I inked the edges of the tags using Memento Ladybug Red ink. I adhered my focal image and sentiments to the card front using foam dimentionals.
I decided afterwards that it looked a bit plain and I thought it needed more sparkle. In order to make the glittery hearts I adhered some double sided tape to fuchsia and red cardstock and then punched out hearts in two sizes. I peeled away the backing from the tape and dipped the hearts into Tourmaline and Garnet Martha Stewart Glitters. I tried to place the punched hearts randomly while still maintaining the balance of the card.
Finally I die cut a small JustRite custom Spellbinders tag so I could put my partners name on it using black peel offs. I used silver thread to attach the tag to the top of the card, I just slipped it through one of the hearts and underneath the black cardstock. The adhesive that was sticking my black mat down held it in place. I finished off by adding red rhinestones in several places.
I am going to be entering this card into Daring Card Makers Love is in the Air Challenge, Little Tangles Love Love Love Challenge and Simon Says Stamp Have a Heart Challenge
Thank you for stopping by, I hope you have enjoyed my card today!
Until next time,
Lucy x
Supplies: Inspire Me paper, Cricut Paper, Cricut, Give a Hoot cartridge, Elegant Edges cartridge, Plantin Schoolbook cartridge, D'vine Swirls Cuttlebug embossing folder, Mememto Rhubarb Stalk and Ladybug Red ink, Versafine Onyx Black ink, Martha Stewart Glitter, Waltzing Mouse Sweethearts stamp set, Heart punch in two sizes, Silver thread, Black peel offs, Sakura Clear Star pen, JustRite custom Spellbinders, Tombow Mono adhesive and Annabelle Stamps sprinkles.
Friday 8 February 2013
With Sympathy Card
Hi all,
Sympathy cards are always so hard to create. I have been too unwell to make any new cards recently so this is one that was made for a very good friend when her father passed away.
 For this card I started off by dry embosssing some white cardstock using the Bird Call Cuttlebug embossing folder and my Cuttlebug. I cut the piece down to size and stamped the With Sympathy greeting in Versafine Onyx Black ink. I cut a piece of cream cardstock to be a little smaller than my 7'' x 5'' card base and stamped the Thinking of you greeting with the same ink. I adhered the embossed panel to the cream cardstock and added some 1'' black satin ribbon. I then matted the panel to the card base to finish the card.
I'm sorry the embossing isn't very clear on the photo, it was really hard to get a shot with enough contrast!
I am cutting it fine for entering before the deadline but I am entering this card into the The Paper Players With Sympathy Challenge.
I hope you have enjoyed looking at my blog today.
Until next time,
Lucy x
Supplies: Bird Call Cuttlebug embossing folder, Cuttlebug, Inspire Me Cardstock, Hero Arts With Sympathy stamp set, Hero Arts Sending Smiles stamp set, Black 1'' ribbon, Versafine Onyx Black ink, Tombow Mono Adhesive tape runner
Sympathy cards are always so hard to create. I have been too unwell to make any new cards recently so this is one that was made for a very good friend when her father passed away.

I'm sorry the embossing isn't very clear on the photo, it was really hard to get a shot with enough contrast!
I am cutting it fine for entering before the deadline but I am entering this card into the The Paper Players With Sympathy Challenge.
I hope you have enjoyed looking at my blog today.
Until next time,
Lucy x
Supplies: Bird Call Cuttlebug embossing folder, Cuttlebug, Inspire Me Cardstock, Hero Arts With Sympathy stamp set, Hero Arts Sending Smiles stamp set, Black 1'' ribbon, Versafine Onyx Black ink, Tombow Mono Adhesive tape runner
Thursday 31 January 2013
Spitfire Birthday Card
Hi all,
Today I am sharing a card I made for my Uncle. He has always loved aeroplanes so when I saw the Hobby Arts Fly Past set I had to buy it!

I started off by stamping the plane onto Copic Xpress It blending card using Memento Tuxedo Black ink. I then coloured it with Copic markers and cut it out. Using a Spellbinders Classic Oval I die cut a piece of white cardstock and sponged it before removing the oval from the die. I adhered the plane inside the oval using a Sakura Quickie glue pen. I then went on to die cut two more ovals and one scalloped oval from red, blue and white cardstock. I matted these altogether to create my focal image.
For the sentiment I die cut some white cardstock using a Spellbinders Labels Trio die and sponged with Memento Summer Sky ink to match my focal image. I then stamped the Happy Birthday and Uncle sentiments using Versafine Onyx Black ink.
I wrapped some Airmail bakers twine around my powder blue cardstock and embellished with a button. I rounded the corners of my powder blue layer and my card base and then I then matted them together. I adhered on the focal image and sentiment and finished off with some red rhinestones to the corners.
I am entering this card into two challenges CAS-ual Fridays Make your Mark Challenge as I used Copics to colour the plane and Simon Says Stamp Anything Goes Challenge.
Supplies: Hobby Arts Fly Past Stamp Set, Beatrix Potter Male Sentiments Stamps, Papertrey Ink Birthday Basics stamp set, Spellbinders Classic Ovals, Spellbinders Scalloped Ovals, Spellbinders Labels Trio, Memento Ink, Versafine Ink, Tombow Mono Adhesive Tape Runner, Sakura Quickie Glue pen, Copic Markers, Copic Xpress it Blending card, Inspire me paper, Papermania Colossal Collection Paper, Annabelle Stamps Sprinkles, Divine Twine Bakers Twine and a Button.
Thank you for reading, I hope you have enjoyed your visit. Please feel free to comment if you have any questions or suggestions!
Until next time,
Lucy x
Subscribe to:
Posts (Atom)